blender banana oat pancake

Banana Oat Blender Pancakes

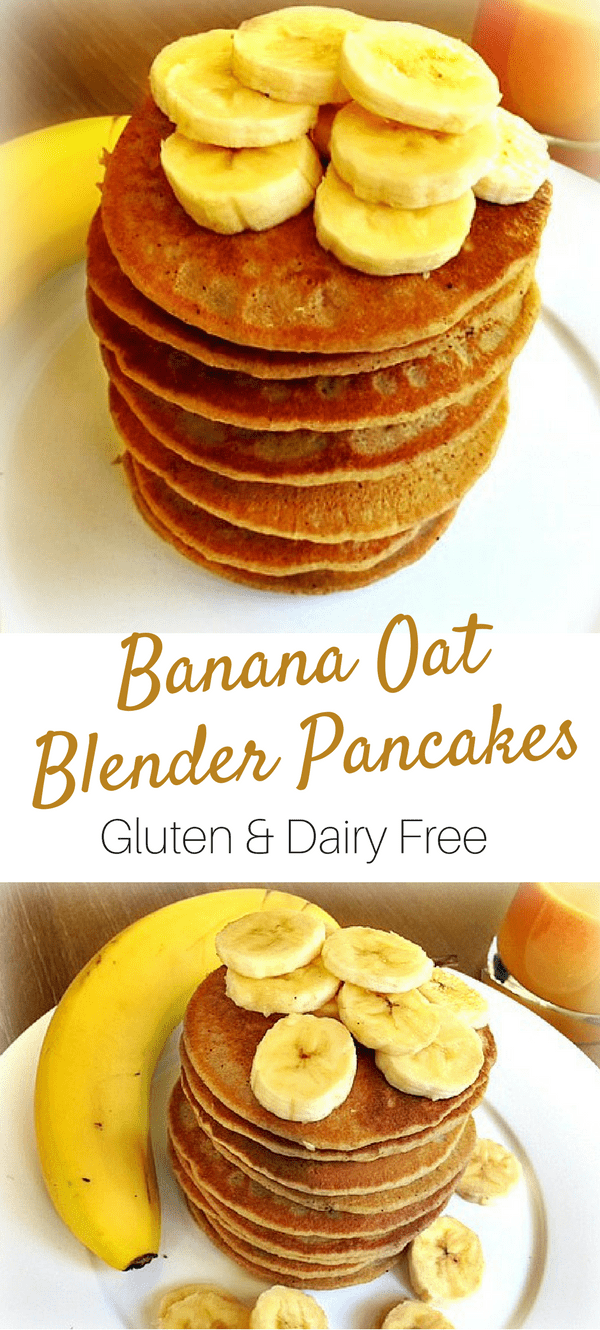
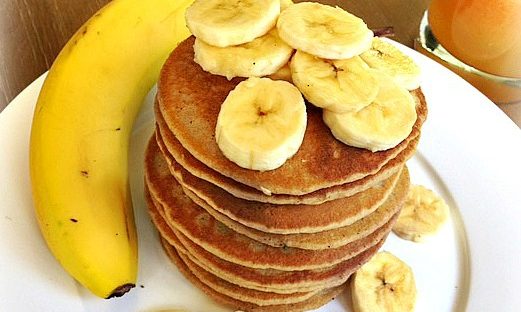
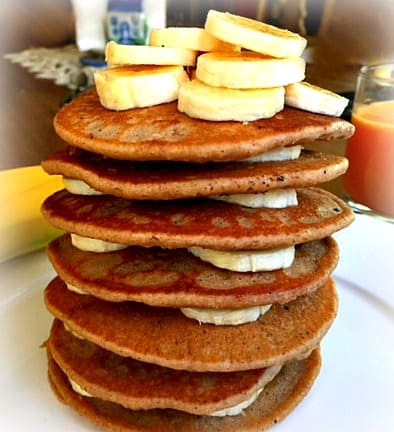
I just love these Gluten Free Banana Oat Blender Pancakes! Throw everything in the blender and pour them onto the griddle! Who doesn’t love pancakes for breakfast? But we don’t want to eat your typical wheat flour pancakes as gluten is what is making you all feel like you have no energy! There are so many delicious alternatives with no unusual ingredients!

blender banana oat pancake

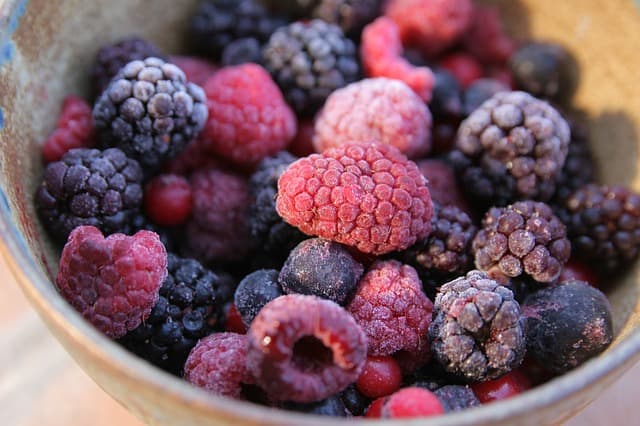
These pancakes are naturally sweet and kid-friendly. Skip the sugary maple syrup and instead heat up some frozen organic berries for a naturally sweet moist topping. You can also cook up some sliced apples with cinnamon. Or just eat them plain! Yum!

Any kind of gluten-free oats will do. Here’s a tip: I buy lots of organic bananas at one time from Costco or Trader Joes. When a bunch ripens, I peel them and freeze them so they are ready to go for smoothies, muffins, and especially these pancakes! Since we are putting them in the blender, you don’t even have to defrost them!

blender banana oat pancake

Any blender will work fine, but my absolute favorite is the Vitamix, especially if you are making your own nut milks. This thing is a workhorse and nothing grinds food up better. It comes with a ten-year warranty, but I don’t think I can possibly kill this thing and believe me, I should have by now. I even have the grain attachment so I can grind up my own gluten-free flours which can be a big money-saver!


Print Recipe
Banana Oat Blender Pancakes- Gluten Free
blender banana oat pancake
Prep Time 5 minutes
Cook Time 12 minutes
Servings
servings
Ingredients
Prep Time 5 minutes
Cook Time 12 minutes
Servings
servings
Ingredients
blender banana oat pancake
Instructions
  1. Preheat your griddle and grease it with coconut oil.
  2. Put all ingredients in the blender, and blend until smooth. Pour about 1/4 cup batter onto skillet and cook until bubbly. Flip and cook on the other side for about 2 minutes. Enjoy!
Share this Recipe

Banana Oat Blender Pancakes Gluten and Dairy free
Fudgy Paleo Blondies

Fudgy Paleo Protein Blondies

You’ve got to try these gooey Fudgy Paleo Protein Blondies! Blondies have always been one of my favorites! I wanted to see if could convert my almond butter chocolate chip cookie recipe into a blondie. I still don’t know the science behind it, but baking with nut butter gives an awesome rise and a super moist texture without using any xanthum gum!

Fudgy Paleo Blondies

The coconut flour in this recipes gives it added protein and the coconut oil gives it that nice shiny, crackly surface that every good brownie should have. Without any grains, these blondies are gluten-free. Also using coconut sugar and honey makes healthier baking  possible and just as delicious!

fudgy paleo blondies

So my five children are the true testers in this house and they loved them! I went upstairs for a minute and came back down to the kitchen to find an empty plate. Good thing I hid one in the freezer for me for later! Shhhhhh……….

You've got to try these gooey Fudgy Paleo Protein Blondies! 

Print Recipe
Fudgy Paleo Blondies
Prep Time 5 minutes
Cook Time 25 minutes
Servings
servings
Ingredients
Wet
Prep Time 5 minutes
Cook Time 25 minutes
Servings
servings
Ingredients
Wet
Fudgy Paleo Blondies
Instructions
  1. Preheat oven to 350 degrees. Line an 8X8 pan with parchment paper, or grease well with coconut oil.
  2. Whisk together all dry ingredients except chips.
  3. In a mixing bowl, mix together wet ingredients on medium speed, until almond butter is incorporated. Add dry ingredient to wet and mix well. Fold in chocolate chips. Batter will be thick.
  4. Spread batter into pan with spatula or oiled hands.
  5. Bake for 22-25 minutes. Cool completely before cutting.
    You've got to try these gooey Fudgy Paleo Protein Blondies! 
Share this Recipe

Fudgy Paleo Protein Blondies

chicken adobo

Chicken Adobo w/Coconut Aminos

This recipe is a little twist on traditional Filipino Chicken Adobo. Instead of just braising the chicken in the sauce, I start by browning the skin in a cold pan. As it heats, the fat begins to render, making the skin nice and crispy!

chicken adobo with coconut aminos

Chicken Adobo traditionally calls for soy sauce, but I wanted to introduce you to an alternative. Soy sauce is essential for Asian food recipes and can add meatiness to your stew and soups, as well as helping to make vegetarian dishes a little more hearty, but soy is one of  the most genetically modified foods on the planet. It can be a cause of food intolerances and can cause inflammation in the body. On top of that, soy sauce contains gluten.

COCONUT AMINOS


But have you ever heard of Coconut Aminos? It is an awesome replacement for soy sauce that doesn’t taste like coconut but has an “umami” taste similar to soy sauce.  It contains coconut tree sap and salt. The sodium content is less than 1/3 of the same amount of sodium in soy sauce. You may already know that coconut is great for heart health. Coconut is also very high in antioxidants, helping the body rid itself of toxins.  Coconut is also an anti-inflammatory food which may help reduce heart disease and prevent diabetes and cancer.

Coconut aminos can be found now at Trader Joe’s and Whole Foods. You can also get it on Amazon. Use it as a replacement for soy sauce in any of your recipes and give it a try in this Chicken Adobo!

Print Recipe
Chicken Adobo
chicken adobo
Servings
Ingredients
Servings
Ingredients
chicken adobo
Instructions
  1. Marinate chicken in coconut aminos for 30 to 60 minutes.
  2. Remove chicken and place on paper towels to dry. Reserve coconut aminos and add coconut milk, vinegar, garlic, bay leaves, and peppercorns.
  3. Place chicken, skin side down in a non-stick pan or seasoned cast iron pan. Place over medium-high heat and brown skin, being careful not to burn, about 5-7 minutes. Turn chicken over and brown for another 5-7 minutes. Pour off all but a tablespoon of fat in pan.
  4. Flip chicken skin side down again. Add coconut mixture and bring to a boil. Simmer, uncovered for 20 minutes. Flip chicken and cook another 15 minutes until chicken is cooked through.
  5. Remove chicken from pan and tent with foil. Return pan to medium-high heat until sauce is thickened, about 5 minutes. Pour over chicken and sprinkle with scallions.
Share this Recipe
Maple Walnut Granola

Maple Walnut Granola w/Prebiotics

Store-bought granola is often considered a health food, but the truth is that it is usually loaded with sugar as well as hydrogenated oils which we want to avoid. It is also often dry and bland. Making it homemade, however, makes a great breakfast or snack as you can control the amount of sweetener and add some truly heart-healthy ingredients like fiber and prebiotics like what is in this Maple Walnut Granola w/Prebiotics.

granola

What are Prebiotics?

You’ve probably heard a lot about probiotics, but do you know what prebiotics are? Probiotics are the good bacteria in your gut whereas prebiotics are a fiber that help the good bacteria grow.  You can kind of consider it the fertilizer for your probiotics.

Probiotics are sensitive and can be affected by heat or bacteria. That is why it is important to always take your pro-biotic supplement with food, as it can not survive the stomach acid. It is also not a good idea to cook probiotics as the heat will destroy them. Prebiotics, on the other hand, are not affected by bacteria or heat, which makes them a great addition to this Maple Walnut Granola.

Inulin

Inulin is a fiber found in thousands of plants,  the most present in chicory. Dietary fiber has been shown to improve digestive health as well as contribute to heart health. When mixed with water, inulin forms a gel which can relieve constipation and help keep you regular. This gel will also help you feel full as it expands in the stomach. Inulin also has the ability to absorb cholesterol, toxins, waste, and fat as it passes through the body.

Inulin can also be used as a substitute for sugar as it is naturally sweet and has a low glycemic level. I have had great success in baking gluten-free bread with it (recipe coming soon). You can also add it to your hot beverage as the heat does not affect it.  It’s a good idea to add it slowly, as some people can be sensitive to it if they have a sensitivity to FODMAPS.

I’ve added just a tablespoon to my Maple Walnut Granola Recipe. 

Print Recipe
Maple Walnut Granola
maple walnut granola recipe
Prep Time 10 minutes
Cook Time 35 minutes
Servings
servings
Ingredients
Prep Time 10 minutes
Cook Time 35 minutes
Servings
servings
Ingredients
maple walnut granola recipe
Instructions
  1. Preheat oven to 300 degrees. Line rimmed baking pan with parchmet paper.
  2. In a large bowl, combine all grains, nuts, seeds, cinnamon, and inulin.
  3. In a small pan, heat coconut oil until melted. Add maple syrup, vanilla, and salt. Pour over oat mixture and stir until thoroughly combined. Spread granola on baking sheet and press down.
  4. Bake until lighlty browned, about 35 minutes, rotaing pan halfway through baking. Remove and stir in dried fruit if desired. Allow to cool on the pan, then break into pieces.
  5. Store in an airtight container for up to two weeks.
Recipe Notes

This granola can easily be made into bars by adding 1/2 cup almond butter and pressing into a baking pan to bake. Cut into bars while still warm.

Share this Recipe
sheet pan chicken with chickpeas

Sheet Pan Chicken with Turmeric

Looking for a quick and easy dinner that is healthy and delicious? This one-pan chicken dish is loaded with flavor. The anti-inflammatory turmeric makes a smooth sauce and the chicken crisps up nicely along with the chickpeas. The fennel and red onions carmelize which enhances their sweet flavor. Adding the carrots makes this a complete dinner you can throw together on any weeknight!

Print Recipe
Sheet-Pan Chicken With Turmeric
sheet pan chicken with chickpeas
Cook Time 1 hour
Servings
servings
Ingredients
Cook Time 1 hour
Servings
servings
Ingredients
sheet pan chicken with chickpeas
Instructions
  1. Preheat oven to 425 degrees.
  2. Season chicken with salt and pepper and teaspoon of turmeric. Place on a parchment-lined rimmed baking sheet.
  3. Combine chickpeas, fennel seed, cumin, red onion, fennel, and carrots in a large bowl. Add olive oil, turmeric, and season with salt and pepper. Toss to coat. Pour vegetables over chicken, and spread in pan.
  4. Cook for one hour until chicken is browned and chickpeas are crispy. Serve.
Share this Recipe

Triple Chocolate Triple Almond Paleo Cookies

Since Valentine’s Day is coming up, I’m thinking chocolate! These Triple Chocolate, Triple Almond Cookies, are almost like a brownie.  Three different types of chocolate give them intense flavor. Almond flour and almond butter make them super-moist, and the almonds on top give them a nice crunch. A bite of sea salt at the end makes these a real treat!

Print Recipe
Triple Chocolate, Triple Almond Paleo Cookies
Servings
Cookies
Ingredients
Servings
Cookies
Ingredients
Instructions
  1. Place 8 ounces bittersweet chocolate in a double boiler and melt. Remove from heat and stir in almond butter and vanilla.
  2. In a medium bowl, sift together almond flour, coconut flour, sugar, raw cacao, baking soda, and 1/2 teaspoon salt. Add the eggs and stir to combine.
  3. Stir in chocolate mixture and 6 ounces chocolate chips. Chill dough for 20 minutes.
  4. Preheat oven to 350 degrees. Line baking pan with parchment paper. Place almonds on a plate.
  5. Roll dough into 1-tablespoon balls and press into almonds. Place on baking sheet, almond side up, and flatten each cookie to about 1/2-inch thick.
  6. Brush top with egg wash and sprinkle with coarse sea salt. Bake 11-13 minutes. Enjoy!
Share this Recipe

Triple Chocolate Triple Almond Paleo Cookies

Staying Healthy When Traveling

My daughter and I are headed to Florida this weekend.  So many of you ask me how you can stay healthy while traveling. Well, with a little planning, you can easily do it. Here are some tips that I use to stay healthy whether I am traveling by plane or by car.

Stay Hydrated

If you are flying, airplanes have very dry air and can dehydrate you. You can bring an empty water bottle through security and fill it at their filtered water stations. Your flight attendant can also fill it for you on the plane.

I love my Travel Berkey because I can refill it no matter where I am and have filtered water anytime. This filter is so powerful, you can put a Coke in it and it will come out like seltzer. (Not that I recommend that) It also saves tons of money on buying plastic water bottles.

Remember that caffeine also dehydrates us along with alcohol, so avoid drinking these if traveling on a  plane.

A snack with chia seeds or chia in water can keep you hydrated as they absorb nine times their size in water. Include fruit in your breakfast which will also help hydrate you.

Bring Healthy Snacks

It’s a good idea to bring healthy snacks with you when traveling, as healthy food can be difficult to find on the road. Trail mix (not with m&ms) and dried fruit make  great snacks. Apples, bananas, clementines, mini cucumbers, red peppers, and avocados travel well. I like to keep individual packs of nut butter in my purse. Soy/dairy-free protein bars are also good to have on hand.

If I am traveling by car, I always bring a small cooler. Most hotel rooms have mini refrigerators now to keep things fresh. When you arrive at your destination, make a quick stop at the local grocery store and pick up some fresh fruit and vegetables to have on hand.

I always bring overnight oatmeal with me in a jar, one with liquid and a few others dry. At my destination, I can pick up almond milk to add or just add water so I have a hearty breakfast wherever I go. This also saves money, since we don’t have to spend money in a restaurant or rely on the carbohydrate-laden continental breakfast served at most hotels.

I always bring at least one salad in a jar for lunch. These travel so well. Here’s How to Pack the Perfect Salad in a Jar from thekitchn.com.

Choose Whole Foods

Just because we are on vacation or traveling doesn’t mean we have to stop healthy eating. If you load up on heavy-laden foods and carbohydrate-filled foods, you are not going to feel well. Try to choose whole foods where you can.

Plan ahead where you will be eating. Search online for organic restaurants that serve healthy options and where a good grocery store is.

Travel Snack Ideas

hummus
applesauce
salad in a jar
non-Gmo popcorn
fresh fruit
kale chips
granola
trail mix
seeds
grass-fed beef jerky
celery sticks
carrot sticks
hard boiled egg (not on a plane, smelly)
homemade muffins

Gluten-Free Almond Poppy Cake

I have an old recipe from a friend for an almond poppy seed cake that has been a staple in my house for years. I always had one in the freezer ready for unexpected guests, or to take to a friend’s house for cake and coffee. But since I don’t eat wheat or dairy anymore, I had forgotten about it, until I came across the old recipe recently. I decided to try to change the recipe up by omitting the wheat and the dairy to see if I could get a replacement just as good as the original.

It took a few tries to get this right because the pound cake-like texture is challenging without the gluten. The addition of almond flour added moisture, and I swapped out canola oil for coconut oil and applesauce. This allowed me to lighten up on the sugar as the original recipe called for 1 3/4 cups of it. I baked these in my mini bundt pan, which makes these come out adorable, and are the perfect little bite. It also works great in a loaf pan or a full-size bundt. This Gluten-Free Almond Poppy Seed Cake is really something special!

Gluten Free Almond Poppy Cake

Print Recipe
Gluten-Free Almond Poppy Cake
GLuten-free almond poppy cake
Prep Time 5 minutes
Cook Time 18-20 minutes for muffins
Servings
Ingredients
Prep Time 5 minutes
Cook Time 18-20 minutes for muffins
Servings
Ingredients
GLuten-free almond poppy cake
Instructions
  1. Preheat oven to 350.
  2. Combine lemon juice with almond milk and let sit for 5 minutes. Sift together flours, baking powder, baking soda, and salt in a mixing bowl. Add remaining ingredients and blend on medium speed for 2 minutes.
  3. Pour into paper lined muffin tins or greased pans.
  4. For muffins/mini bundts: Bake 18-20 minutes For loaf pan: Bake 55 minutes.
Share this Recipe
Dairy-free fish chowder

Dairy-free Fish Chowder

When it’s cold outside, it’s time for soup! This light fish chowder is smooth and deliciously creamy without the dairy! The chunks of lean white fish makes this a hearty meal!

Print Recipe
Dairy Free Fish Chowder
Dairy-free fish chowder
Prep Time 10 minutes
Cook Time 20 minutes
Servings
people
Ingredients
Prep Time 10 minutes
Cook Time 20 minutes
Servings
people
Ingredients
Dairy-free fish chowder
Instructions
  1. Heat oil in large pot. Add onion, garlic, and celery. Saute until softened about 5 minutes. Add sweet potatoes. Stir to combine. Add white wine. Then add 3 cups of stock and red pepper.
  2. Bring to a boil, reduce heat to low and simmer, covered, 10 minutes till sweet potatoes are softened.
  3. Drain cashews and place in a high-speed blender or food processor with remaining 1 cup of stock. Puree until smooth. Add to pot and return to a simmer.
  4. Add fish and cook 5 minutes until cooked through. Add lemon juice, parsley, and season to taste with salt and pepper. Enjoy!
Share this Recipe

*Fish stock is quick and easy. You can get fish bones from your local seafood store. They’ll usually give them to you for free. Try this simple fish stock recipe from the Food Network: http://www.foodnetwork.com/recipes/quick-fish-stock-recipe-1915795

Should You Eat Meat?

Beef really gets a bad rap as being the cause of several major illnesses which include heart disease and cancer. These arguments do not make the distinction between conventional feed-lot beef and 100% grass-fed beef. There is a huge difference though. I want to help you answer the question, “Should you eat meat?”

Essential Amino acids

Our bodies can produce certain amino acids, but essential amino acids can only be obtained from food. Notice the word essential. We need these amino acids for optimal health. You can obtain protein from fruits and vegetables, but they are incomplete. The only complete protein sources of essential amino acids are found in beef, fish, poultry, and eggs. But not all beef is the same.

Grass-fed beef versus grain-fed Beef

You have probably heard that saturated fat from meat is what will clog your arteries and cause heart disease. Grass-fed beef is high in omega-3 fat.  It is this fat that protects the heart and prevents cancer.

A study by researchers at California State University found that beef from cows that exclusively eat grass fit a diet lower in saturated fat and higher in “good fats” and other nutrients. Not only does grass-fed beef contain more omega-3 fats than CAFO beef, but it also is lower in calories and higher in vitamins A and E, antioxidants, beta-carotene.  Omega-3 fat has been shown to reduce the risk of cancer and heart disease.

On the other hand, conventional beef, fed on grain has a much higher  Omega-6 to Omega-3 fatty acid ratio, which can cause inflammation which is the real culprit in heart disease.

Cooking grass-fed beef

grass fed roast beef

You’ll find pastured beef to leaner than conventional beef, so the best cooking method is “low and slow.” For steaks, you want to just sear them, then reduce the temperature to a low setting until done. Chuck roasts, bottom round roast, or briskets are great in the crockpot. Top sirloin roasts or eye round are best cooked at a low temperature for a long time as in this simple roast recipe.

Here is a great source for online grass-fed beef.

Daley, Cynthia A, et al. “A Review of Fatty Acid Profiles and Antioxidant Content in Grass-Fed and Grain-Fed Beef.” Nutrition Journal, BioMed Central, 10 Mar. 2010, www.ncbi.nlm.nih.gov/pmc/articles/PMC2846864/.

Print Recipe
Slow Roasted Beef
This is a simple recipe from Cook's Illustrated that works great for a "low and slow" cooked grass-fed roast.
grass fed roast beef
Servings
people
Ingredients
Servings
people
Ingredients
grass fed roast beef
Instructions
  1. Sprinkle all sides of the roast with sea salt. Wrap and place in refrigerator for at least 24 hours.
  2. Rub roast with oil and season with pepper.
  3. Heat oil in a large skillet and sear roast on all sides.
  4. If roast is not uniform in shape, tie it with 4-5 pieces of kitchen string.
  5. Roast in the oven at 225 degrees until meat thermometer reads 115 for rare, 125 for medium-rare, about 1 1/4 to 2 hours.
  6. Turn off the oven and leave the roast inside without opening door, until thermometer reads 130°F for medium-rare or 140°F for medium, 30 to 50 minutes longer.
  7. Remove roast from oven and allow to rest for 15 minutes. Slice thinly against the grain.
Share this Recipe