Meyer Lemon Tart Gluten/Dairy Free

Meyer Lemon Tart – Gluten/Dairy Free

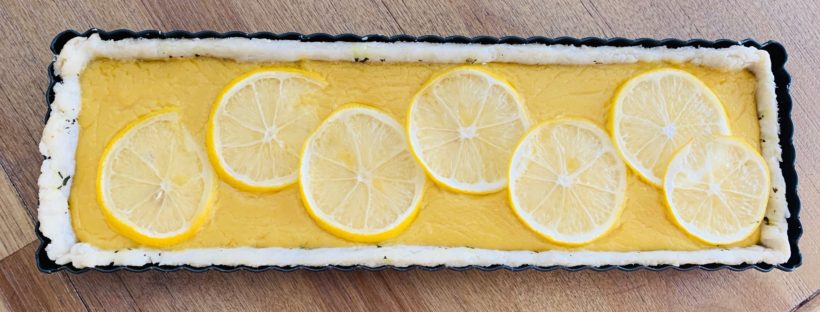
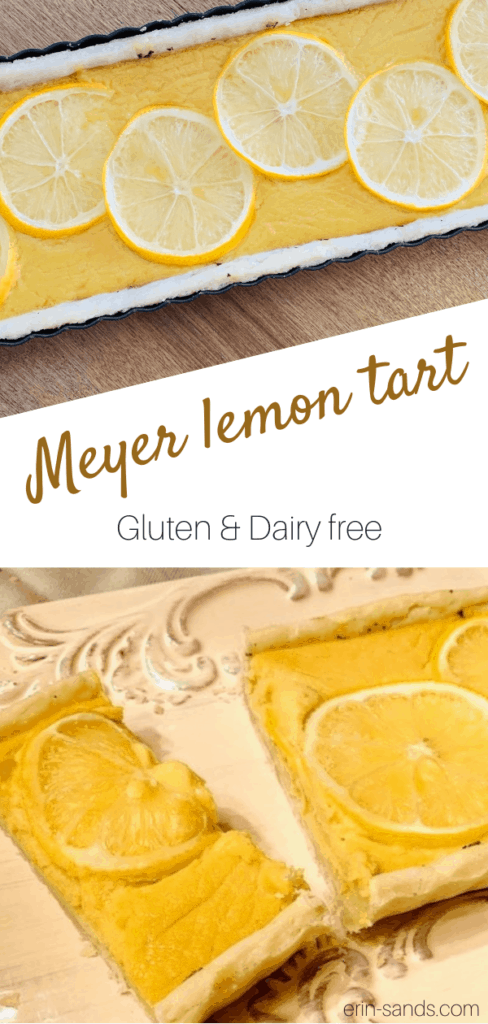
Sweet Meyer lemons are at the peak of the season in winter. They are a cross between a lemon and a mandarin orange. Try this simple lemon curd tart which makes a beautiful presentation!

Meyer Lemon Tart Gluten/Dairy Free

Print Recipe
Meyer Lemon Tart Gluten/Dairy free
Meyer Lemon Tart Gluten/Dairy Free
Servings
servings
Ingredients
For the Crust
Curd
Servings
servings
Ingredients
For the Crust
Curd
Meyer Lemon Tart Gluten/Dairy Free
Instructions
Prepare the Crust:
  1. Follow the instructions for my gluten-free pie crust, whisking in the rosemary with the flour. Shape into a small rectangle and refrigerate for 1 hour.
  2. Preheat oven to 350 degrees. Remove dough and roll between 2 pieces of parchment paper. Transfer to your tart pan and trim the edges. Gently press the dough into the tart pan. Blind bake in the oven for 15 to minutes until edges are firm, but not browned. Cool on a wire rack.
Curd
  1. In a small saucepan, whisk together the lemon juice, zest, maple syrup, eggs, arrowroot, and salt. Heat over medium-low, stirring frequently until thick, about 10 minutes. Remove from heat and stir in the dairy-free butter.
  2. Pour the mixture through a sieve to remove any curdles lumps. Pour filling into baked pie shell and arrange lemons slices on top. Bake for 15 minutes, until set. Cool completely.
Share this Recipe
Gingery Roasted Cranberry Sauce

Gingery Roasted Cranberry Sauce

Here’s a hand-off spin on a holiday classic!

Gingery Roasted Cranberry Sauce

Print Recipe
Gingery Roasted Cranberry Sauce
Servings
Ingredients
Servings
Ingredients
Gingery Roasted Cranberry Sauce
Instructions
  1. Preheat oven to 425 degrees.
  2. Slice the orange in half and place in a square baking dish along with the cranberries. Combine the maple syrup with the spices and 2 tablespoons of water. Pour over the dish.
  3. Roast for 25 minutes until cranberries have burst. Allow to cool about 10 minutes until orange is cool enough to handle. Squeeze juice from orange over cranberries. Add honey and grated ginger. Stir to combine, mashing berries with a wooden spoon.
    Gingery Roasted Cranberry Sauce
  4. Chill overnight.
Share this Recipe
Blueberry Skillet Baked Oatmeal

Blueberry Skillet Baked Oatmeal

This breakfast is loaded with heart-healthy ingredients like chia seeds, flax seeds, blueberries, and steel cut oats which give it a great texture. Make this the night ahead and bake it up in the morning!

Print Recipe
Blueberry Skillet Baked Oatmeal
Prep Time 10 minutes
Cook Time 30 minutes
Servings
servings
Prep Time 10 minutes
Cook Time 30 minutes
Servings
servings
Blueberry Skillet Baked Oatmeal
Instructions
  1. Layer half of the blueberries in a greased 8-inch cast iron skittle or baking pan.
  2. Mix together the oats, flax, chia, salt, and almonds. Spread the mix evenly over the berries. Top with the remaining berries.
  3. Mix together the milk, vanilla, and honey. Pour over the mixture in the pan. It will be very liquidy. Cover and refrigerate overnight.
  4. Preheat oven to 375 degrees.
  5. Bake for 30-40 minutes. Allow to cool slightly and serve with extra maple syrup, if desired.
Share this Recipe
Buckwheat Spicy Pumpkin Loaf

Buckwheat Spicy Pumpkin Loaf

Buckwheat adds a nutty flavor to this not-too-sweet, gluten-free tea cake. You can bake this in a loaf pan or in muffin cups!

Buckwheat Spicy Pumpkin Loaf

Print Recipe
Buckwheat Spicy Pumpkin Loaf
Prep Time 10 minutes
Cook Time 45-50 minutes
Servings
loaf
Ingredients
Prep Time 10 minutes
Cook Time 45-50 minutes
Servings
loaf
Ingredients
Instructions
  1. Preheat oven to 350 degrees. Grease or line loaf pan with parchment paper.
  2. Whisk sugar and eggs until blended. Add in coconut oil and mix well.
  3. In a separate bowl sift or whisk flours, baking powder, baking soda, spices, and salt. Add to wet mixture and stir. Add in pumpkin purée, raisins, and optional nuts. Pour into prepared pan.
  4. Bake for 45-50 minutes until a toothpick comes out clean. Cool for 2 hours before slicing. Enjoy,
Share this Recipe

fish stew

Fish Stew

This classic Italian Fish Stew makes a light, simple meal that takes less than 30 minutes to make! It’s perfect on its own or with a simple gremolata garnish which is made from lemon zest, garlic, and parsley. It works best with a firm whitefish like swordfish, cod, or halibut.Fish Stew

Print Recipe
Fish Stew
fish stew
Cook Time 30 minutes
Servings
servings
Ingredients
Gremolata
Cook Time 30 minutes
Servings
servings
Ingredients
Gremolata
fish stew
Instructions
  1. Drain tomatoes, reserving juice and roughly chop tomatoes.
  2. Heat ghee in Dutch oven over medium heat. Add leeks, tomato paste, red pepper, and thyme and cook until leeks are softened, but not browned, about 10 minutes.
  3. Add garlic and cook for one minute. Stir in wine and reserved tomato juice. Reduce for about 4 minutes. Add clam juice, tomatoes, and water and season with salt. Simmer for 15 minutes.
  4. Cut fish into 1-inch chunks. Season with salt and pepper. Add to pot and simmer for 4 minutes. Remove from heat, cover, and let sit until fish is just cooked, about 3 more minutes. Season with pepper.
  5. Make gremolata while waiting. Serve stew in bowls, topped with gremolata.
Gremolata
  1. Zest lemon peel. Transfer to small bowl. Mix in parsley and garlic. (Can be made 6 hours ahead. Cover and refrigerate.)
Share this Recipe


Shrimp and Watermelon Ceviche

Shrimp and Watermelon Ceviche

One of the best parts of summer is juicy watermelon, the quintessential summer fruit! It goes great in recipes, topped on salads, or in this Shrimp and Watermelon Ceviche. I served it on my salt block which adds subtle salty flavor and makes for a pretty presentation! You can serve this as a light lunch or an extra special appetizer!

Shrimp and Watermelon Ceviche

Health Benefits of Watermelon

Watermelon is one of the most alkalizing foods that you can eat which means that it helps keep your body’s Ph level normal. It is also super hydrating as it is mostly water. Eating watermelon in the summer can help prevent heat stroke due to its high amount of electrolytes.

Shrimp and Watermelon Ceviche

Did you also know that watermelon is loaded with antioxidants and a great source of Vitamin C? This helps fight cancer and protects your bones and cartilage. It is also a good source of beta-carotene, essential for eye health, as well as potassium which is good for high blood pressure and helps prevent heart disease. Plus, watermelon’s pink color comes from the lycopene in it which has been proven to reduce cholesterol.

This low-calorie fruit is also an excellent go-to for staving off sugar cravings. Not only does the crunchy texture and sweetness satisfy your sweet tooth, the high fiber content also satisfies your hunger. Loaded with vitamins, mineral, and amino acids, watermelon should be a big part your diet in the summer!

Shrimp and Watermelon Ceviche

Print Recipe
Shrimp and Watermelon Ceviche
Prep Time 15 minutes
Servings
servings
Ingredients
Prep Time 15 minutes
Servings
servings
Ingredients
Shrimp and Watermelon Ceviche
Instructions
  1. Slice shrimp into 1/2 inch pieces and place in medium bowl. Add lime juice, orange juice, red onion, and chili pepper; toss to combine. Chill for 20 minutes.
  2. Add watermelon, cilantro, avocado, and cucumber and toss to coat. Season to taste with salt and pepper. Serve with baked plantains or tortilla chips.
Share this Recipe

Gluten-free Dutch Baby

Gluten-free Dutch Baby

I have several very old cast iron pans that have taken lots of abuse. There is just nothing like a well-seasoned cast iron pan that is not only versatile but also one of the healthiest cooking vessels to use. You can virtually cook anything in it, as it easily goes from stovetop to oven, as with this super-simple Gluten-free Dutch Baby for a quick and easy breakfast.

Gluten-free Dutch Baby

Cast Iron

A well-seasoned cast iron pan is naturally non-stick so you can skip all of those chemicals used  to make nonstick pans that are toxic and break down at high temperatures. Even modern non-stick pans use chemicals that can break down and cause fumes under high heat. Also, once you scratch them, they are no good anymore. Cast-iron is virtually scratch proof. Even if you do abuse it and cause damage, you just start over again and give it a new surface.

To maintain your cast iron, it is best to clean it while it is still warm. Don’t soak it. Use hot water and a plastic scraper or brush. Never use soap or put it in the dishwasher. Stuck on food can be removed with a sponge and some kosher salt.  Dry your pan immediately and then wipe a very light coat of coconut oil over the entire surface. Each time you cook with it, it get’s better and better!

Gluten-free Dutch Baby

Print Recipe
Gluten-free Dutch Baby
Prep Time 5 minutes
Cook Time 15 minutes
Servings
servings
Ingredients
Prep Time 5 minutes
Cook Time 15 minutes
Servings
servings
Ingredients
Gluten-free Dutch Baby
Instructions
  1. Preheat oven to 425 degrees.
  2. Melt ghee in your 8-inch cast iron skillet. Remove from heat.
  3. In a medium bowl, whisk or sift flours, baking soda, and salt. Whisk in remaining ingredients until combined, but still a bit lumpy.
  4. Pour batter into skillet and bake until it puffs up and is golden brown, about 15 minutes. Serve immediately.
Share this Recipe


Endive and Lettuce Salad with Scallops and Pistachios

Endive and Lettuce Salad with Scallops and Pistachios

This Endive and Lettuce Salad with Scallops and Pistachios makes a perfect summer dinner! The pistachios bring out the nutty flavor of the scallops and it only takes minutes to prepare!

Choosing Scallops

Endive and Lettuce Salad with Scallops and Pistachios

If you live near the coast, buy your scallops fresh from your local fish store. If not, quick frozen scallops are a great choice. Scallops are often soaked in phosphate which is the same ingredient used in soap and detergent, so make sure you look for scallops labeled “chemical free” or “dry-packed.”

The key to cooking perfect scallops is to dry them thoroughly. Then use a good hot pan and only cook them for one to two minutes per side. Endive and Lettuce Salad with Scallops and Pistachios

Print Recipe
Endive and Lettuce Salad with Scallops and Pistachios
Cook Time 20 minutes
Servings
servings
Cook Time 20 minutes
Servings
servings
Endive and Lettuce Salad with Scallops and Pistachios
Instructions
  1. Toast nuts in a dry skillet over medium heat 3 to 5 minutes, until fragrant. Remove from pan and allow to cool.
  2. To make dressing: zest lemon and squeeze juice into a medium bowl. Whisk in oil, dijon, salt, and pepper until creamy.
  3. To make scallops: Heat ghee in large skillet over high heat. Season scallops with salt and pepper and place in a single layer in pan. After about 2 minutes, flip and cook on the other side 1 to 2 minutes more until opaque. Remove scallops, wipe out pan, and repeat to cook remaining scallops.
  4. Assemble: Toss endive and lettuce with dressing and divide among dishes. Place scallops on tops and sprinkle with pistachios. Serve.
Share this Recipe

Dairy-free Creamy Asparagus Soup

Dairy-free Creamy Asparagus Soup

I found this huge organic asparagus at the farmer’s market today which makes the perfect summer soup. The cashews make this Dairy-free Creamy Asparagus Soup thick and creamy without heavy cream! You can skip though, for a nut-free version.

Dairy-free Creamy Asparagus Soup

This is my go-to recipe for any simple creamed vegetable soup. You can swap out the asparagus for any vegetable you like such as zucchini, broccoli, or even a combination like cauliflower and asparagus, or carrot.

Dairy-free Creamy Asparagus Soup

Print Recipe
Dairy-free Creamy Asparagus Soup
Prep Time 5 minutes
Cook Time 20 minutes
Servings
servings
Ingredients
Prep Time 5 minutes
Cook Time 20 minutes
Servings
servings
Ingredients
Dairy-free Creamy Asparagus Soup
Instructions
  1. Heat ghee or oil in a large pot over medium-low heat. Add onions and sprinkle with a dash of salt. Saute until softened, 3-5 minutes.
  2. Add asparagus and stock. Bring to a boil, cover and reduce heat to low. Simmer for 20 minutes. Add drained cashews and puree with an immersion blender or in your high-speed blender. Season with salt and pepper to taste.
Share this Recipe

Gluten-free Cinnamon Raisin Bread

Gluten-free Ceylon Cinnamon Raisin Bread

Warm cinnamon raisin bread is such a special treat and easy to make even without the gluten! This gluten-free Ceylon cinnamon raisin bread is loaded with raisins as well as sweet Ceylon cinnamon. It is deliciously moist on its own or toasted and it makes fantastic French Toast!

Are you eating real cinnamon?

Cinnamon is a favorite spice for most of us and it is well-known for its healing properties and ability to regulate blood sugar. I thought all cinnamon was the same until I visited a spice vendor at a farmer’s market and learned that the cinnamon most us have in our pantries is actually considered fake cinnamon in the spice world. This is usually cassia cinnamon and what you will find in your grocery store.

That is when he introduced me to Ceylon, or “true” cinnamon and WOW! It blew me away. The aroma alone is incredibly sweet and pleasing. There are also many more health benefits from Ceylon as it contains high amounts of antioxidant compounds called proanthocyanadins. Ceylon cinnamon has also been shown to improve digestive health as well as naturally lower high blood pressure

Cassia cinnamon contains high levels of coumarin, a blood thinner, which in high amounts can be toxic to the liver. So if you are using cinnamon every day, switch to Ceylon.

Gluten-free Cinnamon Raisin Bread

Print Recipe
Gluten-free Cinnamon Raisin Bread
Servings
loaf
Ingredients
Servings
loaf
Ingredients
Gluten-free Cinnamon Raisin Bread
Instructions
  1. Grease an 8 1/2 by 4 1/2 loaf pan or line it with parchment paper.
  2. Heat coconut oil, honey, and coconut milk just until lukewarm. (110 degrees) Add in apple cider vinegar.
  3. Sift all dry ingredients into mixing bowl of your electric mixer. With mixer on low, slowly add in warm liquids along with eggs. Beat on low until incorporated. Increase speed to medium and beat for 5 minutes. (This helps build structure in gluten-free dough) Dough will be very sticky.
  4. Reduce mixer to low and add in raisins.
  5. In a small bowl mix together filling ingredients.
  6. Spray a large piece of parchment with oil and transfer half of dough on to it. With wet hands, spread dough into an 8 by 12 rectangle. Sprinkle filling over dough, leaving a 12 inch border.
    Gluten-free Cinnamon Raisin Bread
  7. Using parchment paper, roll dough, beginning at the short side into a tight roll. Transfer dough to pan, seam side up. Repeat with remaining dough, but this time place roll seam side down on top of other roll in pan. Smooth out top.
  8. Cover pan with a clean towel or greased plastic wrap and let rise 1 hour, or until dough rises just above edge of pan.
    Gluten-free Cinnamon Raisin Bread
  9. Preheat oven to 350 degrees.
    Gluten-free Cinnamon Raisin Bread
  10. Bake bread about 1 hour until golden brown on top. Allow to cool 10 minutes, and then remove from pan and place bread on a baking rack to cool completely. Enjoy fresh or toasted with jam!
Recipe Notes

This bread makes great French Toast!

Share this Recipe

Gluten-free Cinnamon Raisin Bread>/div>